Can You Spray Enamel on Painted Wood? Exploring the Possibilities

gf.primary

Enamel paint is known for its durability, smooth finish, and vibrant color options, making it a popular choice for various surfaces. But what if you have a painted wood surface and want to apply enamel paint? Can you spray enamel on painted wood? In this blog, we will explore the possibilities and considerations when it comes to spraying enamel paint on painted wood surfaces, providing you with the information you need to make an informed decision.

Understanding Enamel Paint

Enamel paint is a type of paint that dries to a hard and glossy finish, creating a durable and protective coating. It is typically oil-based or water-based and can be used on a variety of surfaces, including metal, ceramics, and wood. Enamel paint offers excellent adhesion, coverage, and resistance to wear, making it suitable for high-traffic areas or surfaces that require extra protection.

Considerations for Spraying Enamel on Painted Wood

  1. Surface Preparation
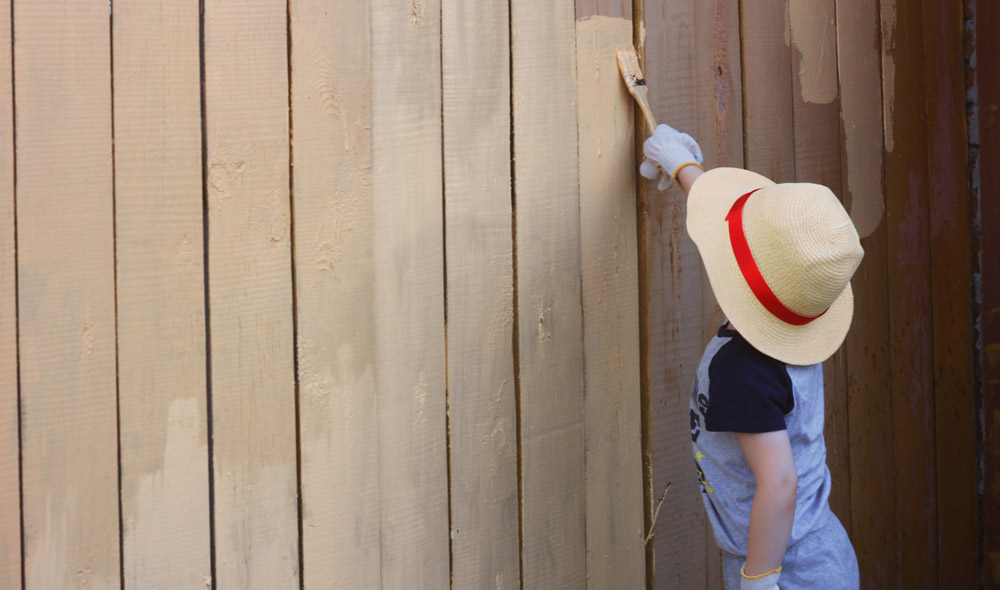
    Before applying enamel paint to painted wood, proper surface preparation is crucial. Ensure that the existing paint is clean, dry, and free from dust, grease, or any contaminants. If the paint is in poor condition or peeling, it’s advisable to remove it completely before applying the enamel paint. Lightly sanding the surface can help create a better bond between the existing paint and the enamel.
  2. Compatibility
    Consider the compatibility of the existing paint and the enamel paint you plan to use. If the existing paint is water-based, ensure that the enamel paint is also water-based. If the existing paint is oil-based, use an enamel paint that is compatible with oil-based coatings. Using the same type of paint base helps ensure better adhesion and compatibility between the layers.
  3. Test and Spot Check
    Before spraying enamel paint over the entire painted wood surface, it’s wise to conduct a small test or spot check in an inconspicuous area. This allows you to assess the compatibility, adhesion, and overall appearance of the enamel paint on the existing painted surface. It’s important to note that the final result may vary depending on the type and condition of the existing paint.
  4. Proper Application Technique
    When spraying enamel paint on painted wood, it’s important to follow proper application techniques. Use a high-quality paint sprayer designed for the specific type of enamel paint you’re using. Ensure that the sprayer is properly cleaned and maintained to prevent clogs or uneven application. Apply thin, even coats, allowing sufficient drying time between each coat as per the manufacturer’s instructions.
  5. Protective Measures
    While spraying enamel paint on painted wood, take necessary precautions to protect surrounding areas from overspray. Cover nearby objects, furniture, and flooring with drop cloths or plastic sheets. Wear appropriate personal protective equipment, such as gloves and goggles, to protect yourself from any potential fumes or overspray.

Spraying enamel paint on painted wood is possible, provided the proper preparation, compatibility, and application techniques are followed. Ensure the existing paint is clean and in good condition, use compatible enamel paint, conduct spot tests, and apply the paint using a high-quality sprayer. While the results may vary depending on the type and condition of the existing paint, spraying enamel on painted wood can provide a durable and visually appealing finish. Remember to always refer to the specific instructions and recommendations provided by the manufacturer of the enamel paint for the best results.

Untreated Wood for Fencing Pros, Cons, and Considerations

gf.primary

When it comes to building a fence, choosing the right type of wood is crucial for its longevity, appearance, and overall performance. While many homeowners opt for treated wood, there may be instances where using untreated wood for a fence is a consideration. In this blog, we will explore the pros, cons, and important considerations of using untreated wood for a fence to help you make an informed decision.

  1. Pros of Using Untreated Wood for a Fence
  • Natural Aesthetic Untreated wood offers a rustic and natural look, which can complement various architectural styles and blend well with the surrounding environment.
  • Cost-Effectiveness Untreated wood is typically less expensive than treated wood, making it a budget-friendly option for fencing projects.
  • Environmental Considerations Untreated wood is free from chemical treatments, making it a more environmentally friendly choice, especially if you prioritize sustainability.
  1. Cons of Using Untreated Wood for a Fence
  • Vulnerability to Rot and Decay Untreated wood is susceptible to rot, decay, and insect damage. Exposure to moisture and the elements can cause the wood to deteriorate more quickly, potentially reducing its lifespan.
  • Maintenance Requirements Untreated wood fences require regular maintenance, including staining, sealing, or painting, to protect them from the elements and prolong their lifespan. This can add to the overall cost and effort involved in maintaining the fence.
  • Limited Lifespan Compared to treated wood, which undergoes chemical treatment processes to resist rot and decay, untreated wood has a shorter lifespan and may require more frequent repairs or replacement.
  1. Considerations for Using Untreated Wood
  • Climate and Environmental Factors The climate and environmental conditions in your area play a significant role in the durability of untreated wood. If you live in a region with high humidity, frequent rainfall, or a high presence of wood-damaging insects, untreated wood may not be the most suitable option.
  • Wood Species Selection Some wood species naturally possess more inherent resistance to rot and insects. Cedar and redwood, for example, are known for their natural resistance to decay and can be more suitable choices for untreated wood fencing.
  • Regular Maintenance If you choose untreated wood for your fence, be prepared to invest time and effort into regular maintenance tasks, such as applying protective coatings, to extend its lifespan and prevent premature deterioration.

While using untreated wood for a fence offers a natural aesthetic and cost-effective option, it comes with inherent drawbacks and considerations. Untreated wood is vulnerable to rot, decay, and insect damage, and requires regular maintenance to prolong its lifespan. The suitability of untreated wood for a fence depends on factors such as climate, wood species selection, and your willingness to invest in ongoing maintenance. It’s essential to carefully evaluate these factors and weigh the pros and cons before making a decision. Consulting with professionals and considering alternative options, such as naturally rot-resistant wood species or treated wood, may also be worthwhile. Ultimately, the choice between treated and untreated wood should align with your specific needs, budget, and long-term goals for your fence project.

Using Polyurethane Foam on Aluminum Fence Posts Pros, Cons, and Considerations

gf.primary

Polyurethane foam is a versatile material commonly used for insulation, sealing, and filling applications. When it comes to fence installation, using polyurethane foam on aluminum fence posts may seem like a convenient solution to secure and stabilize the posts. However, there are certain factors to consider before using this method. In this blog, we will discuss the pros, cons, and considerations of using polyurethane foam on aluminum fence posts to help you make an informed decision.

Pros of Using Polyurethane Foam

  1. Stability and Support Polyurethane foam expands after application, providing stability and support to the fence posts. This can help prevent shifting or leaning, especially in areas with loose or sandy soil.
  2. Quick and Easy Installation Using polyurethane foam can expedite the installation process. The foam fills the gaps between the post and the hole, eliminating the need for manual backfilling with soil or concrete.
  3. Resistance to Moisture and Rot Polyurethane foam is generally resistant to moisture, reducing the risk of water damage and rot to the aluminum fence posts. This can contribute to the longevity and durability of the fence.

Cons and Considerations

  1. Lack of Adjustability Once the polyurethane foam expands and hardens, it becomes difficult to make adjustments to the post’s position. If the post is not properly aligned initially, it may be challenging to correct later.
  2. Difficulty in Removal Removing an aluminum fence post secured with polyurethane foam can be labor-intensive. The foam adheres firmly to the post and the hole, making it time-consuming and potentially damaging to remove the post if necessary.
  3. Potential for Overexpansion Polyurethane foam expands rapidly, and if not applied correctly, it can exert excessive pressure on the aluminum post or surrounding structures, leading to deformation or damage. Careful application and adherence to the foam manufacturer’s instructions are essential.
  4. Aesthetics and Cleanup Polyurethane foam may expand beyond the intended area, resulting in unsightly foam residue visible around the base of the fence post. This can detract from the overall appearance of the fence. Proper cleanup and trimming of excess foam are necessary to maintain a neat and finished look.
  5. Compatibility with Aluminum While polyurethane foam is generally safe to use on aluminum surfaces, it is essential to verify compatibility with the specific type of aluminum used in the fence posts. Some coatings or finishes on aluminum may react with certain chemicals in the foam, potentially causing discoloration or surface damage.

Using polyurethane foam on aluminum fence posts can provide stability and expedite the installation process. However, it is crucial to weigh the pros and cons and consider the specific circumstances of your project. Assess factors such as soil conditions, adjustability requirements, removal potential, compatibility with aluminum, and aesthetic considerations before deciding to use polyurethane foam. Consulting with a professional fence installer or manufacturer can provide valuable guidance based on their expertise and experience. Proper application and adherence to the foam manufacturer’s guidelines are vital to ensure a secure and long-lasting fence installation.

Alternatives to Installing Fence Posts With Cement

gf.primary

When it comes to installing fence posts, cement is a commonly used material for providing stability and strength. However, there are situations where using cement may not be practical or desired. Fortunately, there are alternative methods available that allow you to install fence posts without cement. In this blog, we will explore some of these alternatives and discuss their benefits and considerations.

  1. Post Anchors

Post anchors are metal brackets or sleeves that can be driven into the ground to support fence posts. These anchors have flanges or spikes that provide stability and prevent the posts from shifting. They are typically made from galvanized steel or other durable materials, ensuring longevity. Post anchors are available in various sizes and designs to accommodate different post diameters and types of fencing.

  1. Ground Screws

Ground screws, also known as ground anchors or screw piles, are long metal screws with helical blades that are twisted into the ground. These screws create a stable foundation by utilizing the resistance generated from the rotation. Ground screws offer quick and efficient installation without the need for digging or concrete. They work well in various soil types and provide excellent stability for fence posts.

  1. Driven Posts

For certain types of fences, such as temporary or lightweight installations, driven posts can be a viable option. These posts are typically made of metal or wood and are driven into the ground using a post driver or mallet. The force applied pushes the posts into the soil, securing them in place. Driven posts are suitable for temporary fences, electric fences, or situations where the soil conditions allow for easy insertion.

  1. Tensioning Systems

In some cases, a tensioning system can be used to provide stability to fence posts. This method involves using wire or cables attached to anchor points on each end of the fence line. The tension from the wires helps keep the posts upright and prevents them from leaning or shifting. Tensioning systems work well for certain types of fences, such as wire mesh or chain link fences, and are particularly useful in areas with soft or loose soil.

Considerations

When installing fence posts without cement, there are a few considerations to keep in mind

  • Soil Conditions Ensure that the soil is suitable for the chosen method. Soft or sandy soil may require additional reinforcement or a different installation approach.
  • Fence Type Different fence types may have specific requirements for stability and support. Consider the weight, height, and design of the fence when selecting the installation method.
  • Local Regulations Check with local authorities or homeowner associations to ensure compliance with any regulations or restrictions regarding fence installation.

While cement is a common choice for installing fence posts, it is not the only option available. By considering alternatives such as post anchors, ground screws, driven posts, or tensioning systems, you can successfully install fence posts without cement. Each method has its benefits and considerations, so it’s important to assess your specific needs and the conditions of your project before deciding on the most suitable installation approach. With the right method and proper installation, you can achieve a sturdy and reliable fence that meets your requirements.

Building a Shed Next to a Fence Considerations and Guidelines

gf.primary

If you’re considering adding a shed to your property, you may be wondering whether it’s possible to build it next to an existing fence. While there are no hard and fast rules, building a shed next to a fence can be a practical and space-saving solution. However, there are several factors to consider and guidelines to follow to ensure a successful and compliant construction. In this blog, we will explore the considerations involved in building a shed next to a fence, including property boundaries, permits, access, structural integrity, and aesthetics.

  1. Check Property Boundaries and Building Codes

Before beginning any construction, it’s crucial to determine the exact location of your property boundaries. Check your property survey or consult with a professional surveyor to avoid encroaching on neighboring properties. Additionally, research local building codes and regulations to understand any restrictions or setbacks that may apply to shed construction near a fence.

  1. Obtain Necessary Permits

In many jurisdictions, obtaining permits for shed construction is mandatory. Contact your local building department to inquire about the required permits and regulations for building a shed. Be prepared to provide detailed plans, including the shed’s size, materials, and proposed location next to the fence.

  1. Consider Accessibility

When positioning your shed next to a fence, consider accessibility. Ensure there is enough space around the shed for easy access, maintenance, and potential future repairs. Also, consider how the shed’s doors and windows align with the fence, ensuring they can open and close without obstruction.

  1. Maintain Structural Integrity

Building a shed close to a fence requires careful consideration of the structural integrity of both the shed and the fence. Ensure that the fence is in good condition and capable of supporting the weight of the shed. If the fence needs reinforcement, address any necessary repairs or modifications before proceeding with shed construction.

  1. Preserve Aesthetics

Consider the visual impact of the shed-fence combination on your property’s aesthetics. Choose shed materials, colors, and designs that complement or harmonize with the existing fence. If necessary, paint or stain the shed and fence to create a cohesive and visually appealing look.

  1. Address Drainage and Ventilation

When building a shed next to a fence, pay attention to drainage and ventilation. Ensure that rainwater runoff from the shed does not accumulate against the fence, as this can lead to moisture-related issues. Additionally, consider ventilation requirements for the shed to prevent excess humidity or condensation.

  1. Communicate with Neighbors

If the shared fence borders a neighbor’s property, it’s considerate to communicate your plans with them. Discuss the construction project, its timeline, and any potential impacts on their property. Open communication can help address any concerns and maintain positive neighborly relations.

Building a shed next to a fence can maximize your available space while offering convenience and functionality. However, it’s important to consider property boundaries, obtain necessary permits, ensure accessibility, maintain structural integrity, preserve aesthetics, address drainage and ventilation, and communicate with neighbors. By adhering to these considerations and guidelines, you can successfully build a shed next to a fence, creating a practical and visually appealing addition to your property.

Cost to Install a Wood Fence Gate in 2023: Factors to Consider

gf.primary

Wooden fence gates not only provide access to your property but also enhance the overall aesthetic appeal of your fence. If you’re considering installing a wood fence gate in 2023, it’s essential to understand the factors that contribute to the cost. In this blog, we will discuss the various elements that influence the cost of installing a wood fence gate, including materials, gate size, design complexity, and labor costs. By considering these factors, you can get a better understanding of the potential expenses involved in your project.

1. Materials

The choice of materials significantly impacts the cost of a wood fence gate. Common wood species used for gates include cedar, redwood, and pressure-treated pine. Each type of wood has different prices based on availability, durability, and aesthetics. Additionally, you may need hardware such as hinges, latches, and handles, which can vary in cost depending on quality and style.

2. Gate Size

The size of the gate is another factor that affects the overall cost. Larger gates require more materials and additional structural support, which can increase the expenses. Measure the width and height of the gate opening accurately to determine the size of the gate needed for your project.

3. Design Complexity

The complexity of the gate design can influence the cost. Simple, standard designs are typically more affordable, while custom or intricate designs may require more labor and materials, resulting in higher costs. Additional features like decorative accents, lattice panels, or arched tops can also increase the overall price.

4. Labor Costs

Labor costs are a significant component of the total expense for installing a wood fence gate. The complexity of the gate design, the site conditions, and local labor rates can all impact the labor costs. Hiring a professional fence contractor ensures proper installation and can save you time and potential headaches.

5. Permitting and Site Preparation

Depending on your location, you may need to obtain permits before installing a fence gate. Permit fees can vary, so it’s important to check with your local authorities. Site preparation, such as clearing vegetation, removing existing structures, or leveling the ground, may also affect the overall cost.

6. Additional Factors

Several additional factors can influence the cost of installing a wood fence gate. These include geographical location, accessibility of the installation site, soil conditions, and any unique challenges or requirements specific to your property. These factors can vary significantly and may impact the overall project cost.

The cost of installing a wood fence gate in 2023 depends on various factors, including the materials chosen, gate size, design complexity, labor costs, permitting requirements, and site preparation. By considering these factors, you can better estimate the expenses associated with your project. It is recommended to obtain multiple quotes from reputable fence contractors to compare prices and ensure you receive a fair and accurate cost estimate for your wood fence gate installation. Remember to prioritize quality materials and professional installation to ensure a durable and visually appealing gate that enhances the functionality and appearance of your fence.

Can You Attach a Privacy Fence to a Chain Link Fence? Exploring Your Options

gf.primary

If you have a chain link fence but desire more privacy in your backyard, you may be wondering if it’s possible to attach a privacy fence to it. The good news is that with the right approach, it is indeed possible to transform your chain link fence into a privacy-enhancing barrier. In this blog, we will explore various options for attaching a privacy fence to a chain link fence, considering factors such as aesthetics, functionality, and installation methods.

  1. Installing Privacy Slats

One of the simplest ways to add privacy to a chain link fence is by installing privacy slats. Privacy slats are thin, flexible strips made of materials like PVC, aluminum, or wood, designed to fit into the chain link mesh. They are available in various colors and styles, allowing you to choose an option that complements your aesthetic preferences. Privacy slats can significantly reduce visibility through the fence while still maintaining airflow and sunlight penetration.

  1. Attaching Privacy Screening

Another option to enhance privacy is by attaching privacy screening to the chain link fence. Privacy screening is typically made of woven mesh fabric or vinyl material that is specifically designed for privacy purposes. The screening can be attached to the chain link fence using zip ties or other fastening methods. This method offers more coverage and a solid barrier that blocks the view while allowing air to pass through.

  1. Building a Fence Frame

For a more permanent and solid privacy fence, you can build a frame around the existing chain link fence. This involves constructing posts and attaching horizontal rails to create a sturdy structure. Once the frame is in place, privacy fence panels can be attached to it, providing complete coverage and privacy. This method requires more effort and cost but offers a seamless and cohesive look.

  1. Planting Natural Privacy Screening

If you prefer a greener and more natural approach, consider planting tall shrubs, vines, or climbing plants along the chain link fence. As these plants grow, they will provide a living privacy screen, effectively blocking the view and adding beauty to your space. Ensure that the chosen plants are suitable for your climate and won’t damage the chain link fence.

  1. Consult Local Regulations

Before proceeding with any privacy-enhancing modifications to your chain link fence, it’s crucial to consult your local building codes and regulations. Some jurisdictions may have specific guidelines regarding fence height, materials, and design. Ensure that your proposed modifications comply with these regulations to avoid any potential issues.

While chain link fences are known for their affordability and functionality, they often lack the desired level of privacy. Fortunately, there are several options available to attach a privacy fence to a chain link fence, allowing you to create a more secluded outdoor space. Whether you choose privacy slats, screening, a fence frame, or natural planting, consider your preferences, budget, and local regulations when making your decision. By transforming your chain link fence, you can enjoy enhanced privacy and create a more enjoyable and private backyard oasis.

Can You Paint Your Side of the Fence? Understanding Property Boundaries and Painting Etiquette

gf.primary

When it comes to shared fences between neighboring properties, questions often arise regarding who has the right to paint or modify the fence. In this blog post, we will explore the topic of painting your side of the fence, considering property boundaries, legal considerations, and proper etiquette when it comes to fence maintenance.

Understanding Property Boundaries

Before making any modifications to a fence, it’s crucial to have a clear understanding of property boundaries. Property lines are typically determined by legal surveys or property deeds, and they establish the ownership and responsibilities of each party involved. If you are uncertain about the exact property boundaries, it is recommended to consult a professional surveyor or refer to official property documents.

Permission and Communication

To ensure a harmonious relationship with your neighbors, it’s essential to communicate and seek permission before painting your side of the fence. Even if the fence is on your property, painting it can still impact the appearance of your neighbor’s yard, especially if they can see the painted side. Engaging in open and respectful communication helps avoid misunderstandings and promotes a positive neighborly relationship.

Shared Fence Agreement

In some cases, neighboring property owners may enter into a shared fence agreement that outlines responsibilities for maintenance, repairs, and modifications. Such agreements can specify guidelines on painting and ensure consensus between both parties. If you have a shared fence agreement, review its terms to understand your rights and obligations regarding fence maintenance.

Considerations for Painting Your Side of the Fence

If you have obtained permission or have the right to paint your side of the fence, consider the following factors to ensure a smooth process

  1. Selecting the Paint

Choose a high-quality exterior paint or stain specifically designed for use on fences. Consider factors such as durability, weather resistance, and compatibility with the fence material (e.g., wood, metal, vinyl).

  1. Preparation

Thoroughly clean the fence surface and remove any dirt, debris, or existing paint that may interfere with the adhesion of the new paint. Sanding may be necessary to create a smooth surface for optimal paint application.

  1. Protecting Surrounding Areas

Take measures to protect neighboring property, plants, and other elements from overspray or accidental paint splatters. Use drop cloths, plastic sheets, or masking tape to cover areas that you don’t want to be painted.

  1. Application

Follow the manufacturer’s instructions for the paint application process. Use brushes, rollers, or sprayers to apply the paint evenly, ensuring complete coverage and avoiding drips or runs. Multiple coats may be necessary for an even and durable finish.

  1. Cleanup

Dispose of any paint cans, brushes, or other materials properly, following local regulations for hazardous waste disposal. Clean up any paint spills or overspray promptly to minimize any impact on the surrounding area.

Painting your side of the fence can be permissible and can contribute to the overall aesthetics of your property. However, it is crucial to consider property boundaries, obtain permission if necessary, and maintain open communication with your neighbors. Respect for shared spaces and consensus-building are essential in maintaining positive neighborly relationships. By following proper etiquette and adhering to legal considerations, you can enhance the appearance of your property while fostering a sense of community and respect among neighbors.

Can Vinyl Fencing Withstand Wind? Understanding its Strengths and Limitations

gf.primary

When it comes to choosing a fence, durability and resistance to various weather conditions, including wind, are essential factors to consider. Vinyl fencing has gained popularity due to its numerous benefits, but can it withstand strong winds? In this blog post, we will explore the strengths and limitations of vinyl fencing when it comes to wind resistance.

  1. Design and Construction

Vinyl fencing is constructed with interlocking panels that are securely attached to sturdy posts and rails. This design provides structural integrity and helps the fence withstand external forces, including wind. The panels are typically reinforced with aluminum or steel inserts to enhance their strength and stability.

  1. Wind Ratings

Vinyl fencing is tested for wind resistance, and manufacturers provide wind ratings for their products. These ratings indicate the maximum wind speed that the fence can withstand without sustaining damage. It’s important to consider the wind ratings and choose a vinyl fence that is suitable for the average wind conditions in your area.

  1. Installation and Maintenance

Proper installation is crucial for the wind resistance of any fence, including vinyl fencing. The posts must be securely set in the ground, and the panels should be properly attached to ensure a solid and stable fence. Regular maintenance, such as inspecting for loose or damaged components and making necessary repairs, will help maintain the fence’s integrity.

  1. Wind Conditions

While vinyl fencing is generally sturdy, extremely high winds can pose a challenge for any type of fence. Factors such as the duration and intensity of the wind, as well as the exposure of the fence to open or elevated areas, can impact its performance. In areas prone to severe storms or hurricanes, additional precautions may be necessary to ensure the fence’s wind resistance.

  1. Mitigating Wind Damage

There are steps you can take to improve the wind resistance of your vinyl fence. These include installing the fence in a way that minimizes wind resistance, such as leaving gaps between panels to allow wind to pass through. Additionally, planting windbreaks such as shrubs or trees near the fence can help reduce the impact of strong winds.

Vinyl fencing is designed to withstand normal wind conditions and offers excellent durability and strength. With proper installation, regular maintenance, and consideration of wind ratings, vinyl fences can generally withstand typical wind speeds. However, it’s important to be aware of the wind conditions in your area and take precautions if you live in an area prone to high winds. By understanding the strengths and limitations of vinyl fencing, you can make an informed decision and ensure your fence stands strong in various weather conditions, including wind.

Can My Neighbor Legally Paint My Fence? Understanding Property Boundaries

gf.primary

Maintaining a harmonious relationship with your neighbors is important, especially when it comes to property boundaries and shared structures like fences. However, disputes may arise, and questions may emerge regarding what your neighbor can and cannot do with regards to your fence. In this blog, we will explore the legal aspects surrounding the question “Can my neighbor legally paint my fence?”

Understanding Property Boundaries

Before delving into the specific issue of painting a fence, it’s crucial to have a clear understanding of property boundaries. Property boundaries are determined by legal documents, such as surveys and land deeds, which outline the precise limits of your property. These boundaries establish ownership rights and responsibilities for each piece of land, including any structures, like fences, that are situated on them.

Shared or Boundary Fences

In many cases, fences are built on property lines, serving as shared or boundary fences between neighboring properties. These fences are jointly owned by both neighbors, meaning that both parties have certain rights and responsibilities regarding their maintenance and alteration.

Consent and Communication

When it comes to altering or making changes to a shared or boundary fence, it is essential to have open communication and obtain mutual consent from your neighbor. Generally, both neighbors should agree on any modifications to the fence, including painting it.

Fence Maintenance

In terms of routine maintenance, such as cleaning, repairs, or applying protective coatings, each neighbor has the responsibility to maintain their side of the fence. This means that if your neighbor wants to paint their side of the fence, they are generally allowed to do so as long as it does not infringe upon your property or affect the structural integrity of the fence.

Property Encroachment

If your neighbor intends to paint your side of the fence without your consent, it may be considered an encroachment on your property. Encroachment refers to any unauthorized use or alteration of someone else’s property. Painting your side of the fence without permission could be a violation of your property rights.

Legal Recourse

If you find yourself in a situation where your neighbor has painted your fence without consent, it is advisable to address the issue through open dialogue and peaceful resolution. Start by discussing the matter with your neighbor, expressing your concerns and desire to have the fence restored to its original condition.

If communication fails or the dispute escalates, you may need to seek legal advice. Laws regarding property boundaries and shared fences can vary depending on your jurisdiction, so it’s important to consult a legal professional who specializes in real estate or property law to understand your rights and options for recourse.

In general, your neighbor does not have the legal right to paint your fence without your consent. Shared or boundary fences should be maintained and modified through mutual agreement and open communication. Understanding your property boundaries and engaging in respectful discussions with your neighbor can help prevent disputes and maintain positive relationships within your community. If conflicts arise, consult legal professionals to navigate any potential legal issues and find a resolution that is fair to both parties involved.

1 2 3 5